Best Ways to Display Mineral Specimens
Table of Contents
- Why Proper Display Matters for Your Mineral Collection
- Choosing the Right Mineral Display Stands and Mounts
- How to Light Mineral Collections for Maximum Impact
- Protecting Mineral Specimens from UV Damage and Dust
- Arranging Specimens for Visual Appeal and Organization
- Budget-Friendly and DIY Display Solutions
- Museum-Quality Curation: Cataloging and Digital Integration
- Frequently Asked Questions
Last Updated: September 28, 2026
The ability to display mineral specimens well transforms a collection from scattered rocks into a curated gallery. The difference between a haphazard pile and museum-quality presentation comes down to three things: the right stand or mount, proper lighting, and thoughtful arrangement. This guide covers exactly how to achieve each.
Why Proper Display Matters for Your Mineral Collection
A well-displayed collection tells a story, draws the eye, and preserves your investment. Dust damages delicate surfaces, poor lighting hides color and clarity, and careless arrangement wastes visual impact.
Collectors who invest in display infrastructure report higher enjoyment and notice details previously missed. Proper curation also protects specimens from UV damage, temperature fluctuations, and physical harm.
Choosing the Right Mineral Display Stands and Mounts
Not every specimen needs the same support. Flat tabular crystals require different handling than spheres or clusters. The stand you choose should complement the mineral's natural shape while keeping it stable and visible from multiple angles.
Easel Stands for Flat and Tabular Specimens
Easel stands work well for flat specimens like jasper slabs and thin crystal formations, tilting forward to catch light and reveal patterns.
Look for easel stands with adjustable angles so you can optimize the view. A stand that holds specimens between 30 and 60 degrees works for most flat pieces. Brass or wood options provide stable, attractive bases that don't compete with the mineral itself. The Smithsonian's guide to mineral display emphasizes that angled presentation increases visibility of internal patterns and color gradation.
Easel stands shine for specimens like the Natural Picture Jasper Cube from IG Crystal Archive, LLC, which features scenic landscape patterns across each face.
Brass Caliper Stands and Tripod Bases
Brass caliper stands and tripod bases grip minerals at three points, providing secure support without obscuring the specimen while distributing weight evenly.
These stands work best for specimens 2 to 6 inches in diameter. Brass and stainless steel resist tarnishing and allow easy rotation, ideal for geodes where the interior cavity is as important as the exterior.
The Amethyst Geode Sphere Pair with Stands from IG Crystal Archive, LLC includes display stands.

Acrylic Platforms and Risers for Layered Displays
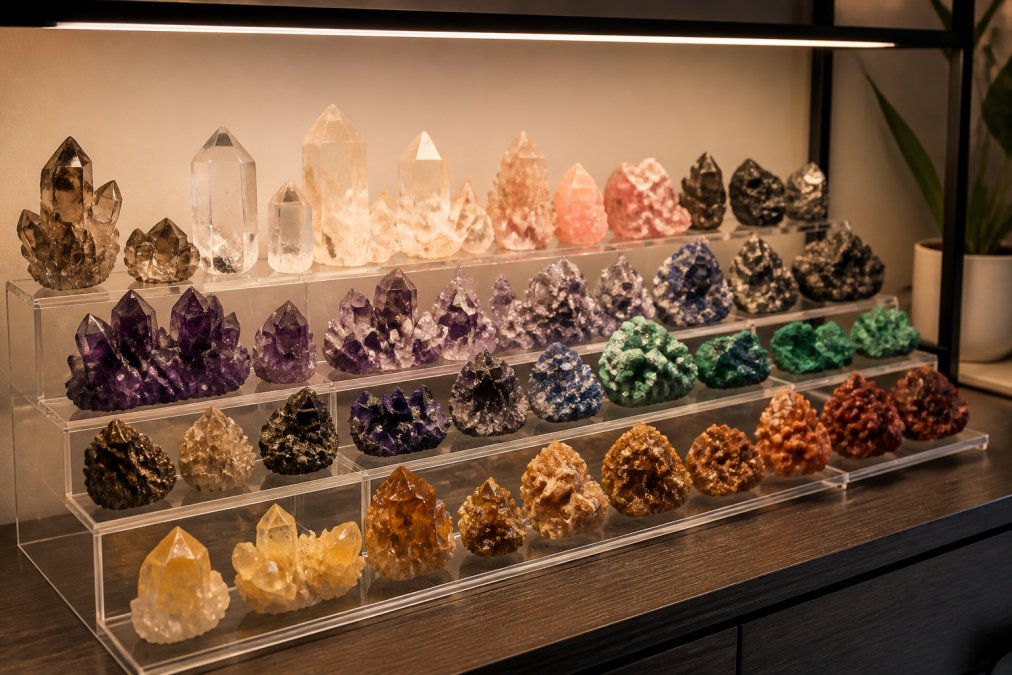
Acrylic platforms and risers create vertical depth by stacking specimens at different heights. Clear acrylic stays invisible while maximizing shelf space and showcasing each piece.
Use acrylic platforms for displays with 5 or more specimens to prevent a flat appearance and guide visitors' eyes naturally through the collection.
How to Light Mineral Collections for Maximum Impact
Lighting transforms a mineral display from ordinary to extraordinary. The right light reveals color, sparkle, and internal structure. Poor lighting flattens even striking specimens into dull rocks.
LED Strip Lighting for Shelf Displays
Position LED strips 6 to 12 inches above specimens. Warm white LEDs (2700K to 3000K) enhance earth tones; cool white (5000K to 6500K) makes blue and purple specimens pop.
LEDs consume minimal power, generate negligible heat, and last for years. Dimmable strips let you adjust brightness based on time of day or specific specimens.
Mount strips along the underside of a shelf above your display so light washes across the minerals below. Avoid pointing lights directly upward into visitors' eyes. The goal is to illuminate the specimens, not create a light show.
Spotlight Techniques and Lighting Temperature
Directional spotlights angled at 45 degrees reveal texture and sparkle, working especially well for druzy clusters and geodes.
Position spotlights at 45 degrees from above or to the side to avoid glare.
UV and Fluorescent Mineral Display Setups
Some minerals fluoresce under UV light, revealing hidden colors. A dedicated UV display area creates striking visual impact.
Use UV-A lights (365 nanometers) in darkened alcoves. Rotate displays on and off to prevent long-term UV damage.
Combine UV displays with regular lighting so visitors can see both the specimen's normal appearance and its fluorescent properties. This contrast amplifies the "wow factor" and demonstrates the mineral's unique characteristics.
Protecting Mineral Specimens from UV Damage and Dust
Preservation requires active management. UV exposure from windows and sunlight fades colors and can damage crystal structures over time. Dust accumulation dulls surfaces and settles into crevices, making specimens look neglected even when they're not.
Natural Blue Celestite Crystal Cluster →
Dust Accumulation Prevention Strategies
Remove dust with a soft brush or compressed air, brushing gently in one direction. Avoid water or liquid cleaners unless the mineral is water-stable.
Display cases with glass or acrylic doors dramatically reduce dust accumulation. A closed display case keeps specimens clean for months, requiring only occasional maintenance. For open shelf displays, position minerals away from high-traffic areas and air vents where dust concentrates.
Cover open displays with lightweight fabric drapes when not in use.
Climate Control and Preservation for Long-Term Care
Temperature and humidity fluctuations cause mineral damage. Specimens expand and contract with temperature changes, opening micro-fractures that worsen over years. Humidity causes some minerals to absorb moisture, destabilizing their internal structure.
Maintain a stable environment with consistent temperature and humidity. Avoid placing displays near windows, heating vents, or air conditioning units, as these locations can experience temperature swings that stress specimens.
Use a basic hygrometer to monitor humidity in your display area. If humidity climbs, consider adding silica gel packets to your display cases or running a small dehumidifier nearby. Conversely, if humidity drops, consider adding a small humidifier.
Store specimens in archival-quality boxes during off-season or long-term storage. Acid-free tissue paper and foam padding prevent movement and protect surfaces. Label each specimen with its location, date acquired, and any relevant geological information.
Arranging Specimens for Visual Appeal and Organization
How you arrange specimens determines whether your collection reads as intentional curation or random accumulation. Strategic arrangement creates visual flow and makes each piece more impactful.
Stepped Arrangement and Vertical Orientation
Stepped arrangements use height variation to create visual interest. Place taller specimens in back, shorter ones in front, so every piece is visible from the primary viewing angle. This pyramid-like structure mimics museum displays and feels intentional rather than accidental.
Vertical orientation works for tower-shaped specimens and tall clusters. Standing a specimen upright on its natural base emphasizes height and draws the eye upward. Horizontal orientation works for flat slabs, geodes, and specimens where the interior cavity is the main attraction.
Mix orientations within a single display. Alternate between vertical towers and horizontal slabs. This variation prevents visual monotony and showcases each specimen's unique geometry. The Matching Lace Agate Tower Pair from IG Crystal Archive, LLC stands 11 inches tall, commanding attention through vertical presence while the Nature Painted Picture Jasper Pair displays landscape patterns best in horizontal orientation.


Organizing by Size, Color, and Specimen Type
Three organizational systems work well for mineral collections: by size, by color, or by specimen type (geodes, clusters, towers, spheres).
Size-based organization creates visual balance. Group similarly-sized specimens together so the display doesn't feel chaotic. Larger statement pieces anchor a display; smaller accent pieces fill gaps and add detail.
Color-based organization creates a gradient that's visually satisfying. Arrange specimens from warm tones (amber, gold, red) through neutral (gray, brown, white) to cool tones (blue, purple, green). This rainbow effect draws the eye and makes the collection feel cohesive.
Type-based organization groups specimens by geological category. All geodes together, all clusters separate, all spheres in their own section.
Budget-Friendly and DIY Display Solutions
Professional display infrastructure can be expensive, but effective alternatives exist. DIY solutions let you build quality displays without premium price tags.
Museum-Quality Curation: Cataloging and Digital Integration
Serious collectors catalog their specimens for reference, insurance, and research. Digital cataloging transforms a collection from personal treasure into an organized asset.
Frequently Asked Questions
What are the best ways to display mineral specimens without a cabinet?
Open shelving with mineral display stands works beautifully for specimens. Use easel stands for flat pieces, brass caliper stands for spheres and clusters, and acrylic risers to create height variation. LED strip lighting underneath shelves highlights details. This approach lets collectors appreciate specimens from all angles while keeping the display accessible for cleaning and rotation.
How do you protect mineral specimens from UV damage and dust?
Position your display away from direct sunlight and windows where UV rays cause fading and discoloration. Use glass display cases or acrylic covers for valuable specimens. For open shelves, dust regularly with a soft brush or microfiber cloth. Maintain stable humidity and temperature. Consider UV-filtering window film if your collection sits near natural light sources.
What lighting temperature is best for displaying mineral collections?
Cool white LED lighting can reveal crystal detail and natural colors. Warm white can create ambiance. For fluorescent minerals, specialized UV lighting (365nm wavelength) makes them glow dramatically. Combine lighting types: use cool LEDs for general display and add UV accents for special specimens like those from IG Crystal Archive's curated collection.
How should I arrange my mineral collection for the best aesthetic display?
Use stepped or staggered arrangement to prevent specimens from blocking each other visually. Group by color families or mineral type for cohesion, or mix sizes to create visual rhythm. Position larger, statement pieces as focal points, like the Titanium Aura Quartz Cluster or Matching Lace Agate Tower Pair, with smaller specimens surrounding them. Vary vertical orientation: some specimens standing upright, others tilted or horizontal for dynamic visual interest.
What are creative DIY display solutions for mineral specimens?
Repurpose wooden crates, shadow boxes, or floating shelves as budget-friendly displays. Use museum-quality wax or removable putty to secure specimens safely. Create tiered displays with stacked books or cardboard risers under fabric. Thrift stores offer vintage stands and bases adaptable for mineral display. Digital cataloging apps help track specimen locations and details, adding organization to DIY setups without expensive infrastructure.