Crystal Identification Guide: How to Identify Any Stone
Table of Contents
- What Is Crystal Identification and Why It Matters
- Crystal Identification Chart: Key Properties to Observe
- Hardness Testing: Using the Mohs Scale
- Cleavage and Fracture Patterns
- Identify Crystals From a Picture: Visual Comparison Methods
- Mineral Identification Tools and Resources
- Spotting Imitations: Natural Crystals vs. Glass and Treated Stones
- When to Consult a Professional Gemologist
- Frequently Asked Questions
Last Updated: October 16, 2026
What Is Crystal Identification and Why It Matters
Crystal identification is the process of determining what mineral or stone you're looking at based on observable physical properties.
At IG Crystal Archive, LLC, we know that whether you're a seasoned collector or just starting out, knowing how to identify crystals matters.
The good news: you don't need expensive equipment or a geology degree.
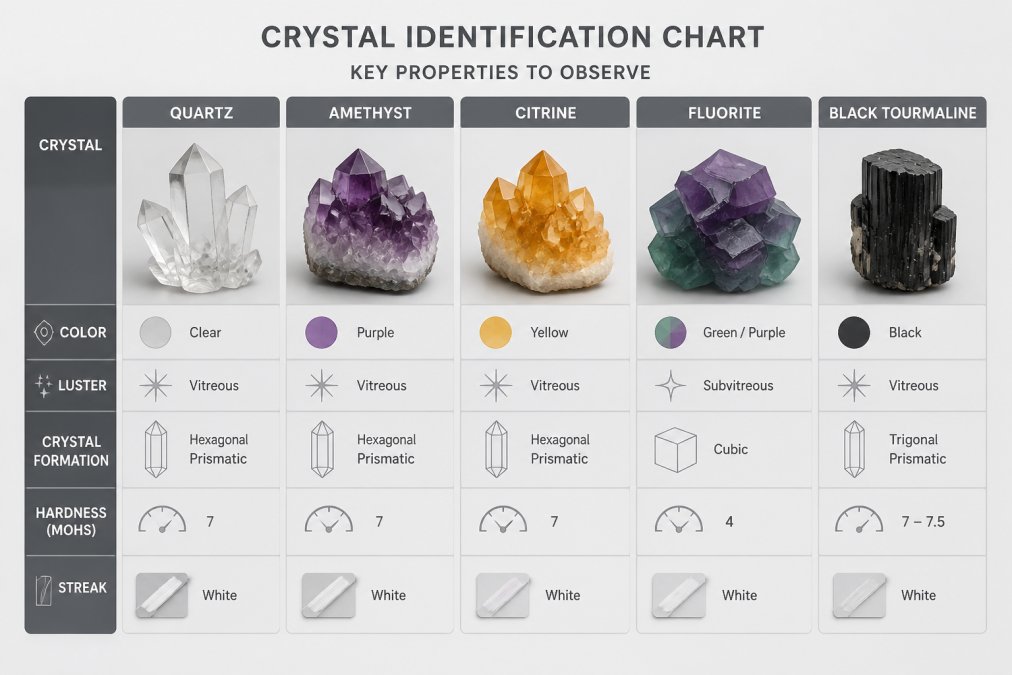
Crystal Identification Chart: Key Properties to Observe
The foundation of crystal identification rests on observing and interpreting physical properties. The more characteristics you note, the narrower your possibilities become. Here are the key properties that matter most.
Color and Transparency
Color is often the first thing you notice, but it is one of the least reliable identifiers on its own. Many minerals share a color: smoky quartz can resemble some tourmalines, and amethyst shares color space with lepidolite and fluorite.

Transparency tells you how light passes through the stone: transparent (you can see clearly through it), translucent (light passes through but the image is cloudy), or opaque (no light passes through).
A practical habit: describe color with modifiers rather than single words. "Pale violet with cloudy white zoning" is more useful than "purple." Note whether the color is uniform or patchy.
Luster and Surface Appearance
Luster describes how a crystal's surface reflects light: metallic (like polished metal), vitreous (like glass), resinous (waxy or oily), pearly, or dull and earthy.
Surface appearance also includes texture: smooth, rough, or marked by visible striations (fine lines across the surface).
Judge luster on a clean, dry surface in daylight. A dusty crystal can read as dull when it is actually vitreous.
Crystal Shape and Formation
Crystals grow in geometric patterns determined by their internal atomic structure. Quartz forms six-sided points, pyrite forms cubes, tourmaline grows in long striated columns, and malachite forms rounded, layered botryoidal patterns.
Pay attention to the termination (the end of the crystal), the cross-section (six-sided, square, bladed, or irregular), and whether it grew as a single point, a cluster, or a massive piece with no visible geometric faces.
Hardness and the Mohs Scale
Hardness is one of the most useful field properties because it is repeatable and produces a number you can compare against references.
Common reference points: your fingernail is about 2.5, a copper penny about 3, a steel nail or ordinary glass about 5.5 to 6, a ceramic tile roughly 6 to 6.5, and quartz is 7.
Cleavage and Fracture
When a mineral breaks, it breaks in predictable ways based on its internal structure.
Fracture is how a mineral breaks when it does not follow a cleavage plane. Some minerals fracture in a curved, shell-like pattern (conchoidal fracture), common in quartz and glass; others break irregularly or splinter.
You do not need to break your specimens to observe this. Look at natural breaks, edges, or existing damage.
Specific Gravity and Heft
Density, usually expressed as specific gravity, compares a mineral's weight to an equal volume of water. Quartz is about 2.65, pyrite about 5.0, galena about 7.5. You don't need a lab balance: hefting a specimen against a similar-sized piece of known material flags outliers.
Putting the Properties Together: A Simple Decision Path
No single property identifies a mineral. Observe several properties, then use them to eliminate candidates:
- Start with the obvious. Note color, transparency, and luster. These three observations alone often reduce the field to a handful of common candidates.
- Check hardness next. A quick scratch test separates soft minerals (under 3) from mid-range minerals (3 to 6) and hard minerals (7 and above). This is often the single most decisive step.
- Look at shape and breakage. Crystal form, cleavage, and fracture confirm or contradict the shortlist.
- Use heft as a tiebreaker. Specific gravity helps separate visually similar minerals, such as quartz from glass or feldspar from a denser mineral.
- Record everything. Write down each observation and the candidates it supports. A written profile is easier to compare against a field guide or a photo chart than a memory of the stone.
This is the same logic professional mineralogists use, just with simpler tools.
Hardness Testing: Using the Mohs Scale
The Mohs hardness scale is your most reliable field test. It ranks minerals from 1 (softest) to 10 (hardest) on a simple principle: a harder mineral scratches a softer one.
How to Perform a Safe Hardness Test
Here's the process: gently try to scratch the crystal with your fingernail. If your nail leaves a mark, the crystal is softer than 2.5 (calcite, selenite, and similar minerals).
The key word is "gently." A light, controlled scratch on an inconspicuous area is enough, so test on a spot that won't be visible if you're buying or keeping the specimen.
Understanding Test Limitations
Hardness testing has real limits. Dust or weathering can give a false result, visible fractures or weak points can break under testing, and some brittle minerals shatter under pressure even when technically hard.
Hardness also varies slightly by crystal direction in some minerals, so a hardness test gives a range, not a precise answer.
Cleavage and Fracture Patterns
When a mineral breaks, it breaks in predictable ways based on its internal structure.
Fracture is how a mineral breaks when it doesn't follow a cleavage plane. Some minerals fracture in a curved, shell-like pattern (conchoidal fracture).
Natural Blue Celestite Crystal Cluster on Silver Stand | Raw Celestine Geode →
You don't need to break your specimens to observe this. Look at natural breaks, edges, or any damage the crystal already has.
Identify Crystals From a Picture: Visual Comparison Methods
If you have a photo of a crystal and want to identify it, start by documenting what you see: color, shape, visible formations, and the matrix it sits on. Crystals are often found alongside other minerals (epidote frequently appears with quartz), and those associated minerals provide geological context that narrows possibilities.

Use a crystal identification chart or reference guide to compare your photo against known specimens, looking for exact matches in shape, color, and formation pattern. If comparing multiple candidates, check whether the luster matches: a dull mineral won't match a high-gloss reference image of the same mineral.
Mineral Identification Tools and Resources
You don't need to buy expensive equipment. Most of what you need is already in your home or costs very little.
Home Testing Supplies
A steel nail, copper penny, ceramic tile, and glass plate are your core testing kit. Add a small magnifying glass (even a 10x loupe from a hardware store) for surface details and striations, plus a scale measuring to tenths of a gram to compare specimen weight.
Keep a notebook to record color, transparency, luster, hardness results, and other details. Over time you'll build a reference library of your own observations.
Reference Guides and Apps
Physical field guides remain invaluable. The USGS (United States Geological Survey) offers free mineral identification resources and educational materials on their website.
Digital resources like mineral databases and identification apps vary in quality: some are crowd-sourced and unreliable, others curated by geologists. Cross-reference app results against established guides before concluding.
Spotting Imitations: Natural Crystals vs. Glass and Treated Stones
Not every crystal for sale is natural and untreated. Glass imitations are common, synthetic crystals are made in labs, and natural stones are sometimes dyed, heated, or irradiated to enhance color. The practical skill is knowing which observations reliably separate natural specimens from manufactured or treated ones, and when your confidence should drop.
Glass and Synthetic Imitations
Glass is the most common imitation because it is cheap and easy to mold into convincing shapes. Several clues separate it from natural crystal:
- Bubbles. Glass often contains tiny spherical bubbles, especially near the surface or in the interior. Natural crystals can contain inclusions, but they are usually angular, crystalline, or fluid-filled in characteristic patterns, not perfectly round scattered bubbles.
- Conchoidal fracture. Both glass and quartz fracture in curved, shell-like patterns, so fracture alone does not separate them. Look instead at the edges: glass edges are often smooth and rounded from molding, while natural crystal edges are sharper and more irregular.
- Too-perfect uniformity. Glass tends to have uniform color and no internal growth zoning. Natural amethyst, for example, commonly shows color zoning, with deeper and lighter bands.
Synthetic crystals such as lab-grown quartz can be chemically identical to natural material, so visual identification may not distinguish them. Some synthetics require laboratory analysis, and a seller's disclosure is often the most reliable evidence you will get.
Dyed, Heated, and Irradiated Stones
Treatments are common and not automatically dishonest, but they affect value and should be disclosed. Watch for these patterns:
- Dye concentration in cracks. Dyed stones often show color concentrated in fractures and surface pits, with lighter or colorless areas elsewhere. A natural stone's color is usually distributed through the material, even when zoned.
- Unnaturally uniform or vivid color. A dyed stone may look painted on, with a hue that does not match the natural range for that mineral. Natural amethyst, for example, rarely shows the flat, saturated purple of some dyed quartz.
- Heat treatment. Heat-treated citrine (often heated amethyst) tends to have a slightly different transparency and color character than natural citrine, and the difference can be subtle. Heat treatment is widely accepted in the trade but should be disclosed.
A useful rule: the more a specimen's color looks like a paint swatch and the less it shows natural variation, the more suspicion is warranted. Natural crystals almost always show some irregularity, zoning, or inclusion pattern.
A Confidence Framework
Not every identification deserves the same confidence. A practical framework:
- High confidence: The specimen matches a common mineral on multiple properties (color, hardness, luster, shape, fracture) and shows natural growth features. Examples include a clearly terminated quartz point that scratches glass and shows conchoidal fracture.
- Moderate confidence: The specimen matches a common mineral on most properties but one observation is ambiguous, or the specimen is massive and lacks crystal form. This is common with tumbled stones and carved pieces.
- Low confidence: The specimen is rare, valuable, or visually ambiguous, or it shows signs of treatment or imitation. In these cases, home testing is not enough.
When confidence is low, stop guessing and seek a professional opinion. A gemologist or mineralogist can use a polariscope, refractometer, specific gravity balance, and UV light to resolve what visual inspection cannot. Many universities with geology programs and some museums offer identification services, and a professional report is valuable documentation for insurance, resale, or your own records.
When to Consult a Professional Gemologist
Home testing has limits.
Many universities with geology programs offer identification services, as do some museums.
| Testing Method | What It Reveals | Time Required | Accuracy |
|---|---|---|---|
| Visual inspection | Color, luster, shape, transparency | 2-5 minutes | Moderate (requires experience) |
| Hardness test | Mohs scale range | 3-10 minutes | Good (one of the most reliable field tests) |
| Density comparison | Weight relative to size | 5 minutes | Moderate (helps narrow candidates) |
| Cleavage/fracture observation | Internal structure patterns | 5 minutes | Good (distinctive for many minerals) |
| Professional gemology | Definitive identification with equipment | Hours to days | Excellent (most reliable) |
Identifying crystals becomes easier with practice. You're learning to see what geologists and collectors see: the specific characteristics that make each mineral unique.
When you find a crystal you love, take the time to understand what it actually is.
IG Crystal Archive, LLC makes this easier by curating hand-selected specimens and providing transparent information about each piece. Our Natural Smoky Quartz Crystal Cluster is a perfect example, you can see the dark brown translucent points, observe the natural matrix, and understand exactly what you're getting.
Frequently Asked Questions
How do I identify what crystal I have?
Start by observing the crystal's color, transparency, and luster. Then test its hardness using the Mohs scale by scratching it gently with common objects. Check for cleavage patterns and examine the crystal shape. Compare your observations against a crystal identification chart or mineral reference guide. If results are unclear, consult a gemologist for definitive identification.
Can I identify a crystal using a picture?
Yes, you can identify crystals from a picture by analyzing visible properties like color, transparency, and crystal shape. However, photos alone cannot show hardness or cleavage. For the most accurate identification, combine visual comparison with physical testing. Online mineral databases and apps allow you to upload photos for reference, but professional verification is recommended for valuable specimens.
What tools do I need for crystal hardness test at home?
A crystal hardness test requires only everyday items: a fingernail (hardness 2.5), a copper penny (about 3), a steel nail or ordinary glass (about 5.5 to 6), and glass (5.5). Scratch the crystal gently with each item to determine where it falls on the Mohs scale. These non-destructive tests help narrow down mineral identity.
What features should I check when identifying a crystal?
Check color, transparency (clear, translucent, or opaque), and luster (metallic, glassy, or matte). Examine crystal shape and any visible formations. Test hardness using the Mohs scale. Look for cleavage (how the stone breaks naturally) and fracture patterns. Note size, weight, and any striations or inclusions. Compare these physical properties against a crystal identification chart to narrow candidates.
How can I tell similar-looking crystals apart?
Use the Mohs hardness test to distinguish minerals with similar colors but different hardness levels. Check luster carefully, pyrite has a metallic sheen while chalcopyrite appears more brassy. Examine cleavage patterns, which are unique to each mineral. Look for distinctive formations and color banding. Consult a detailed mineral identification chart or reference guide specific to your candidates. When in doubt, consult a gemologist.
Is there an app to identify crystals for free?
Several free apps allow you to identify crystals from photos by comparing images against mineral databases. However, free apps have limitations, they rely on visual matching and cannot perform physical tests. For valuable or rare specimens, combine app results with hands-on testing and professional verification for accuracy.
How do I know if a crystal is natural or treated?
Natural crystals show uneven color distribution, natural inclusions, and weathering patterns. Treated or dyed stones often have unnaturally uniform color, especially in areas where dye concentrates. Check for signs of heat treatment or synthetic creation by examining clarity and examining under magnification. Ask the seller about sourcing and treatment history. Reputable dealers like IG Crystal Archive provide transparency about specimen authenticity and origin.