How to Start a Mineral Collection: A Beginner's Guide
Table of Contents
- Essential Tools for Beginners
- Understanding Mineral Properties and Identification
- How to Label Mineral Specimens
- Best Ways to Display Mineral Collections
- Field Collecting vs. Purchasing Specimens
- Common Mineral Collecting Mistakes to Avoid
- Ethical and Legal Collecting Practices
- Building Your First Mineral Collection
- Frequently Asked Questions
Last Updated: September 22, 2026
Essential Tools for Beginners
To start a mineral collection, you need practical tools that make field work safer and more productive, nothing expensive, just the right basics for identification, collection, and preservation.
A rock hammer is essential, one end strikes rock, the other handles detail work. Safety glasses protect against flying fragments. A magnifying glass reveals crystal structure and luster. A streak plate (unglazed ceramic) tests hardness by scratching specimens and observing powder color. Use cloth pouches or labeled plastic containers to organize and protect specimens during transport.
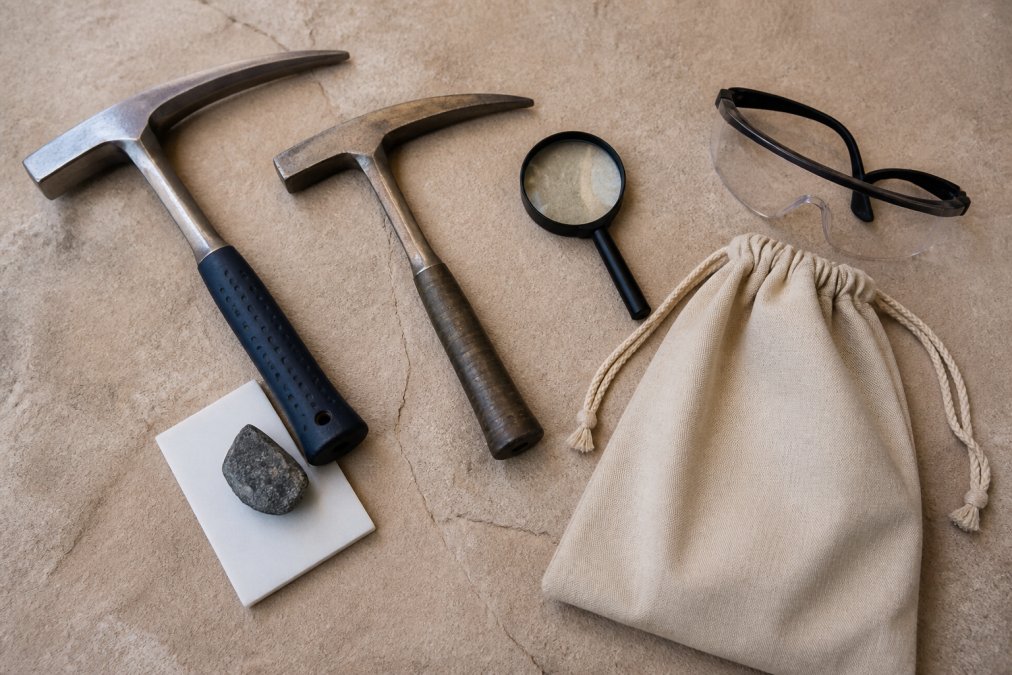
Record location, surrounding rock type, and notable features in a field notebook, this provenance becomes increasingly valuable as your collection grows. Use a GPS device or smartphone app for coordinates. Gloves and a headlamp protect you during collection.
Understanding Mineral Properties and Identification
Identifying minerals accurately separates serious collectors from casual enthusiasts. Minerals have measurable properties that distinguish one species from another, transforming your collection from random rocks into a curated archive with geological significance.
The Mohs Hardness Scale
The Mohs hardness scale ranks minerals 1-10 by scratch resistance (Mohs Hardness Scale). Talc (1) scratches with a fingernail; diamond (10) scratches everything (Mohs Hardness Scale). This is your primary field identification tool because hardness is quick to test and rarely changes.
Test hardness with common objects. If your specimen scratches glass but not steel, it falls between 5.5 and 6. Quartz (7) scratches glass; feldspar (6) does not. This single test separates common minerals immediately.
Hardness guides storage: softer minerals (below 5) need protection from harder stones; harder minerals tolerate more handling and display.
Luster, Streak, and Crystal Habit
Luster describes how light reflects off a mineral's surface: metallic, vitreous, pearly, or resinous. These become reliable visual cues after you've seen examples.
Streak is the powder color left when dragging a mineral across a streak plate. Streak often identifies minerals more reliably than body color, especially for opaque specimens.
Crystal habit is the shape minerals naturally form. Recognizing these shapes enables instant identification without testing hardness or streak.
How to Label Mineral Specimens
Labeling transforms a collection into an organized archive with scientific value. Each specimen needs a unique identifier, mineral name, location, date acquired, and provenance documentation.
Assign each specimen a catalog number (001, 002, etc.) using an archival paint pen. Include the mineral name, location, date acquired, notable features, and GPS coordinates for field-collected pieces.
Create a digital inventory linking each catalog number to a photograph, mineral properties, geological significance, and market value. Digital tools enable searching and filtering by properties, location, or date.
Store labels separately to prevent damage. Use archival cards in specimen boxes, or place printed labels beneath display pieces rather than attaching them directly.
Best Ways to Display Mineral Collections
Display transforms stored inventory into a visual experience. Proper lighting and protection highlight natural beauty while ensuring long-term preservation.
Natural daylight brings out color in quartz, amethyst, and citrine. LED lights positioned above or behind specimens emphasize luster without heat damage. Avoid extended direct sunlight, as some minerals fade. Arrange lighting to minimize glare and emphasize crystal forms.
Glass cabinets with adjustable shelving protect specimens while allowing visibility and organization by color, type, or origin. Acrylic cases suit smaller collections. Open shelving displays dramatically but requires regular dusting. Many collectors combine all three approaches.
Large Raw Black Tourmaline Chunk →
Space specimens to highlight each one individually and ease dusting. Group similar minerals together or arrange by color gradient. Some collectors organize by geographic origin to tell the story of a region's geology.
Micro-mounts place tiny crystals on pedestals or in small boxes, allowing magnification and study without large display space, ideal for limited room or crystal-quality focus.
Field Collecting vs. Purchasing Specimens
Both approaches build legitimate collections with different experiences and economics.
Field collecting connects you directly to geology and deepens appreciation for mineralogy. You control quality and spend minimal cost. The limitation: access varies by state and locality; some regions lack accessible sites for desired minerals.
Purchasing specimens offers convenience and access to rare pieces you'd never find locally. Specialized retailers like IG Crystal Archive curate hand-selected specimens, ensuring quality and authenticity. You gain specimens from distant localities, minerals from specific mines, famous deposits, or geologically significant sites. The trade-off is cost and the need to trust the seller's expertise and honesty. A high-quality specimen from a reputable dealer commands a premium, but you receive exactly what you're paying for.
Many collectors combine both approaches. They field-collect common, locally-available minerals and purchase rare or geographically distant specimens from dealers. This hybrid strategy builds a geographically diverse collection while maintaining the rewarding experience of field work. Starting with field collecting teaches you mineral identification and geology. Moving to selective purchases adds depth and specialization to your collection.
Common Mineral Collecting Mistakes to Avoid
New collectors repeat predictable mistakes that slow their progress and sometimes damage specimens. Recognizing these patterns helps you build a stronger collection from the start.
Collecting without documentation is the most common error. You find a beautiful specimen, bring it home, and months later can't remember where it came from or what it is. Without provenance, the specimen loses scientific value and becomes decorative only. Always record location, date, and surrounding geology. This metadata is what transforms a collection into a meaningful archive.
Storing specimens improperly causes preventable damage. Soft minerals like calcite and fluorite scratch easily when stored next to harder specimens. Soluble minerals like halite absorb moisture and deteriorate in humid environments. Delicate crystals break when stacked carelessly.
Ethical and Legal Collecting Practices
Responsible collecting respects property rights, protects natural resources, and follows local regulations. These practices ensure that future collectors can enjoy the same opportunities you do.
Building Your First Mineral Collection
When you start a mineral collection, it should reflect your genuine interests rather than trying to collect "everything." This focus makes the project manageable and meaningful.
Frequently Asked Questions
What are the essential tools needed for a beginner mineral collector?
Start with a rock hammer for field work, a magnifying glass for specimen examination, a streak plate to test mineral color, and a hardness scale for identification. Safety glasses protect your eyes during collecting. A collection bag or container keeps specimens secure. As you advance, consider adding more specialized tools. Many beginners purchase kits that bundle these basics together, making it easier to begin without overwhelming expense.
How do you properly identify and label mineral specimens?
Identify specimens using the Mohs hardness scale, streak plate tests, and visual examination of luster and crystal habit. Label each piece with a unique catalog number, mineral name, location found or purchased, collection date, and any notable characteristics. Use archival-quality labels and waterproof ink to ensure durability. Store documentation in a digital inventory system or physical notebook alongside your specimens. This practice builds provenance and helps you track your collection's growth and organization over time.
Are there specific ethical guidelines for collecting minerals in the wild?
Always obtain permission before collecting on private land and check local regulations regarding public land access. Many areas require collecting permits. Respect protected areas and avoid collecting endangered mineral species. Take only what you need, fill any holes you dig, and leave the landscape undisturbed. Purchase from reputable dealers when possible to ensure ethical sourcing. Supporting mission-driven businesses that prioritize responsible curation helps advance ethical collecting practices across the hobby.
What is the best way to store and display a growing mineral collection?
Store specimens in archival-quality containers away from direct sunlight and humidity extremes to prevent damage. Display cases with UV-protective glass preserve specimens while showcasing their natural beauty. Organize by mineral type, crystal system, or locality for easy reference. Separate fragile specimens and avoid stacking heavy pieces on delicate ones. Consider micro-mounts for smaller specimens to maximize display space. Rotate displayed pieces periodically to prevent fading. Quality display pieces, like raw Black Tourmaline chunks or Titanium Aura Quartz clusters, serve both storage and aesthetic purposes in your home.
How can I determine the value and quality of a mineral specimen?
Quality depends on color vibrancy, crystal clarity, size, and rarity. Assess specimens for natural imperfections versus treatment or synthetic origin. Larger, well-formed crystals with exceptional luster command higher values. Locality and provenance significantly influence worth. Authentic, hand-selected pieces from reputable collectors offer better long-term value than mass-produced alternatives. Starting with quality over quantity builds a collection you'll treasure and that retains its value.
What's the difference between field collecting and purchasing specimens?
Field collecting offers adventure, direct connection to geology, and lower cost, but requires permits, knowledge, and time investment. Purchasing from dealers provides curated, authenticated specimens with documented provenance and guarantees of authenticity. Beginners often benefit from purchasing initial specimens to learn identification before venturing into field work. Many collectors combine both approaches: building foundational knowledge through purchased pieces, then field collecting in permitted areas. Hand-selected specimens from trusted sources ensure you start with quality pieces that inspire continued collecting.
What are common mistakes beginners make when starting a mineral collection?
Avoid impulse purchases without understanding what you're collecting. Don't neglect proper labeling and documentation from the start. Never collect on private land without permission or in protected areas. Failing to research mineral properties leads to misidentification. Storing specimens in poor conditions causes damage and deterioration. Buying from unreliable sources risks acquiring treated, synthetic, or misidentified pieces. Start with a clear focus, whether collecting by type, locality, or aesthetic preference, rather than accumulating randomly. Taking time to learn proper curation practices prevents costly mistakes later.